Friday, December 14, 2012

Measure Twice, Cut Once (Yes...Really...)

While I have to admit that, for the most part, renovation of the trailer has gone well; there have been a couple of tough “I-really-should-have-known-that” lessons I have learned along the way.  I am sharing them with you here with the hopes that you’ll avoid them altogether.

Lesson #1:  NO surface in a vintage trailer is level, plumb, parallel, or straight. 

Lesson #2: See Lesson #1.

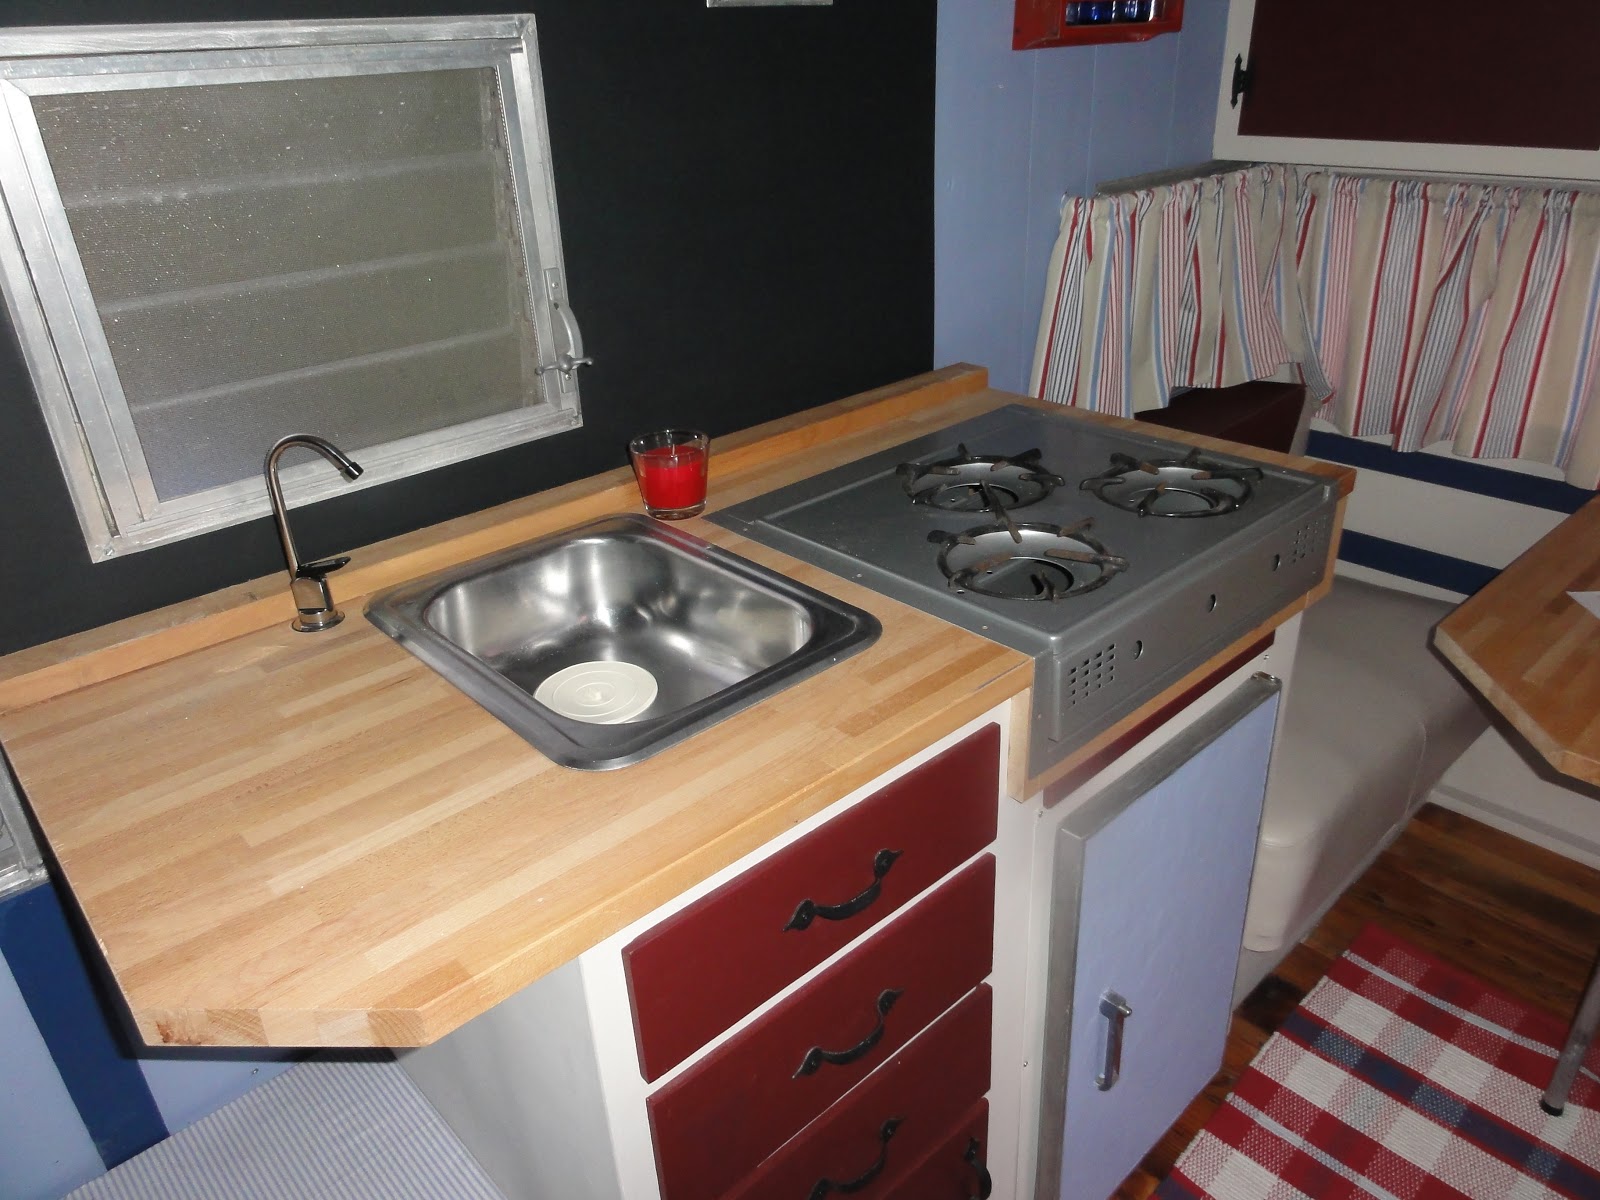
When measuring the backsplash piece, for instance, you cannot assume that if you measure the distance between the top of the countertop and the bottom of the cabinet on one side, that the other side is the same.  It isn’t.  The same goes for the width of the countertop and the cabinet themselves.  They appear to be directly on top of each other and the same width.  They aren’t. Yes, I know this means that the backsplash won’t be a perfect rectangle.  It isn’t. 

Deal with it and move on.

Lesson #3:  Measure twice, drill once.

Lesson #4:  See Lesson #3.

A butcher block countertop is NOT made of forgiving material.  If you drill a hole in the wrong place you have to replace the whole countertop, you can’t just put another piece of laminate over the hole.  (otherwise known as Plan B) When you go to the store to buy a new countertop only to discover they have discontinued it, and won’t be getting ANY more in, you have to move to Plan C.  When you realize the hole you drilled can only be used for only ONE type of faucet and the local camper supply has also discontinued the faucet you need, you have to move on to Plan D.  When you finally find a faucet that will fit in the hole, but the supply line you need is a different size than the supply line that store that carries, you need to…yes…move on to Plan E.

Yes, I finally got the water faucet in but…wow….did I learn a HUGE lesson in the meantime.   I still need to install the pump faucet for the onboard water supply but I’m not sure I even want to touch the countertop with a drill ever again.

Lesson #5: Trim, caulk, and wood filler is your friend.

If you have to cut a window opening in plywood with a jigsaw, it won’t be pretty.  Aluminum window trim is your friend.  If you cut the front opening of the cupboard with a jigsaw and sneeze while doing so, resulting in a wave-looking notch near the corner, screen molding is your friend.  If you’re drilling a hole for the faucet and accidently tilt the drill bit so damages the lower cabinet wall….well…I’ll let you know how I end up fixing this particular Boo Boo. 

It’s still staring at me….

Tuesday, November 6, 2012

Thank you, Grandma, Part II

As I mentioned in a prior post, early in the trailer project my Grandma died.  Her small “donation” to my project’s cause was greatly appreciated, and celebrated.  But, her contribution would not end there.

My Grandma loved to sew.  She collected scissors, notions, fabrics, patterns, yarn, buttons, lace, snaps, needles, etc…  You name it, she had a collection of it.  So, while I am in the middle of the trailer project (with parts and pieces already cluttering my house and garage) I got an email from my cousin telling me that, as the executor, he decided to give me my Grandma’s entire sewing room…furniture and all.  He asked if I could come up with my truck that weekend and get it so it would not get mixed in with the other items that would be sold at her estate sale.

I brought home an entire TRUCK LOAD of boxes, bags, and furniture that once was her sewing room.  Determined not to let it go unused, or sit around getting dusty, I promptly set off to Target to buy bins so I could sort through the cardboard boxes and make sense of it all.   When all was said and done I had over 30 pairs of scissors, hundreds of spools of thread, dozens of zippers, hundreds of yards of fabric, a sewing machine with table, and notions galore.   (Eight shoe box sized bins of notions and 4 very LARGE clear plastic bins full of fabric.)

And it didn’t end there.

A few weeks later the rest of the family had gone through the house and picked out what they wanted, before the estate sale.  I got another email asking if I would like to come visit again and sort through it all to see if I could “use” any of it.

And…another truck load found its way home with me. 

It was like I was on American Pickers, only, I didn’t have to pay for anything and there were no TV cameras.  I found vintage hats, and hat boxes, mason jars and various glass containers, cookbooks from the early 1900’s, shelving, an old canvas umbrella, a ladder stool, two suitcases, a new lawmower (yeah!) a steamer truck (VERY cool) some shelving for a future painting project, kitchen gadgets and glasses, more yarn, four more boxes and one large trunk full of fabric…and more stuff that I cannot remember.

Let the sorting begin again.

Most of my vintage finds are now part of my living and dining room décor.  The kitchen gadgets and other vintage items, including the mason jars, are now part of my trailer décor.   The sewing machine and notions found their way into our family’s “productivity room”.

Another trip to IKEA yielded the most amazing fabric find (yeah, like I need more fabric!?) for the curtains and the sewing machine was put immediately to use making curtains AND pillows. 

The best part about making simple curtains?  No patterns required.

The best part about my picking adventures?  I have memories of my estranged Grandma to take with me on my trailer adventures; and I have the knowledge that, although she was not a part of my life, she remembered me.

Life is crazy sometimes, isn’t it?


Sunday, October 21, 2012

A Hacksaw is NOT your Friend

This post is about my icebox.  Yes, an entire post about a little metal box that holds ice and keeps your vegetables cool.  Who’d thunk that such a small and unassuming thing such as an icebox would give me such trouble?

Well, it did.


First, I’d like to start off with a big “What were they thinking???!!”  The icebox was screwed into the lower cabinet with 12, count them, 12 screws on the hinge side.  I’m not sure why and can only assume that the “one on each corner” approach just didn’t seem, practical, or enough, or…I don’t know.

“How many screws on the other side?” you may ask.  Two.  Why?  I don’t know. 

Next, I wanted to take the door off so I could paint it or do whatever creative treatment I decided on.  The screws in the door hinge wouldn’t unscrew, they were rusted on.  So, I did what any other semi normal woman would do…I cut them off with a hacksaw.  Oops.  Um…now how do I get the door back on? 
 
Sigh…

The door had a bit of rust on it and I didn’t want to do what everyone else did and just paint it so….I got some dark red, off white, and dark blue scrap book paper and decoupaged the door.  I thought it looked kinda’ cool.  Ok, pretty cool.  Um, maybe cool?
 
My friend who is an interior design student said “It looks like a 4th grade art project went very very wrong.”

Sigh…

Maybe I needed a new icebox? So, I found one on craigslist for $15.  I brought it home and TA DA!!..it didn’t fit and no matter how much I wanted it to…it didn’t fit.

Sigh…

So I painted the icebox door after all.  Painting over the decoupage gave it a fun and unexpected texture.  I like fun.  I like unexpected texture.  Score!  Now back to my original quandary, how do I get the door back on?

I went to a Fastenal store which carries, yep, all kinds of fasteners.  I took the icebox and the door with me.  They were closed but…drum roll…the Do It Hardware Center nearby was OPEN!!  I took it in and handed the box and the door to a very curious but helpful owner / gentleman who spent the next 45 minutes with clamps, and hammers, and going back and forth from the store to the front counter, trying various screws and post thingies, re-attaching the door.

When he was all done he said “That’ll be $2.75” 

Yeah!!

I bought some duct insulation and replaced the rotted cardboard that WAS the icebox's insulation, wiped the inside again with bleach and water and screwed it back into the cabinet.   The 12 screws on the hinge side look pretty weird but I bet you wouldn’t notice if I didn’t tell you. (or ask you to take it out)  Overall it looks pretty great and is a nice focal point for the entry.


The best part of this story is that I sold the other icebox on craigslist for $20!

Nothing to sigh about there….


Friday, October 5, 2012

FREE is a Great Price!

It’s amazing what I’ve learned about myself during the process of renovating my little Scotsman.  I have discovered that I am even more capable than I thought I was.  I’ve conquered my fear of electricity (rewired the interior lights) and found creative and cost effective solutions for many issues; like the countertop, exterior paint, and flooring.

I originally wanted a dark blue countertop because I was using dark blue as my accent / trim color.  So, I tore out the countertop and table top and hauled them in the back of my truck to the local countertop manufacturer.  (No guessing required. Here’s what the measurements are, dude!)

I almost hit the FLOOR when he quoted me $580!!!  Perhaps you have your math wrong?  Nope. Five hundred and eighty big ones.  Um.  Well.  No thanks.

Oh crap.  Now what?
 
The countertop...before demolition.  Icky!
 
As I have mentioned, I love craigslist but even more so (if that’s possible) I LOVE IKEA!  They get a bad rap for having crappy stuff but like any store, if you know what you’re looking for you can get amazing deals and décor items at IKEA.  So, off I went in search of countertop options.  Once again, they did not disappoint.  I found a 9 foot x 28 inch piece of 1” thick butcher block for…drum roll….$59!!!  It was more than enough for the table top and the countertop with cutting boards to spare.  Woo Hoo!!!
 
The NEW Ikea countertop.  Love, love, love it!
 
For the exterior paint I contacted a guy who had recently painted two, fifty three foot long, semi-truck trailers for me.  (I am a purchasing professional so I know how to find people, and stuff!)  One of my friends provides all her basic needs merely by bartering.  Seriously, she barters for everything she needs! 

Ok, where am I going with this?

So I asked Kevin the paint guy, “I’m not sure how to ask this because I’ve never done it before but…would you be willing to paint my vintage trailer for barter?”

He asked me a few questions about what I could offer him in trade, we came to an agreement and I’m happy to say that my exterior paint job was FREE.  (if you don’t count the labor hours I owe him.)  I had gotten two other bids from auto painters and they wanted $1000 - $1200 so FREE was a gift from Karma, or God, or whatever higher power you believe in.  He painted my trailer the same factory color as my convertible V6 that I’ll be towing her with.  They’re a matched set!


Before Paint....


After Paint.... 
I also know a guy (OK, by now I bet you’re thinking “this chick knows everyone!” and you wouldn’t be too far off…) that does amazing interior remodel work with reclaimed barn wood.  So I called him up and he said I could bring my truck and get as much reclaimed barn wood as I wanted for…you guessed it….FREE!

Of course, the wood was wet with rusted nails but I had a vision and I would not let a little wood working project get in my way of jaw dropping floors.

Enter, once again, Mark to the rescue!

He loaned me his planer, I borrowed a table saw from the neighbor, and I bought a miter saw on craiglist for $15; and went to work.  I ran all the boards through the planer to get them all the same thickness (well, almost….close enough?) and then cut them to length and dry fit them in the space.  Mark generously donated a weekend to run them through the table saw and then meticulously installed them.  I sanded the floor and put two coats (so far) of polyurethane down.

I’m telling ya’….these are the most beautiful floors you have ever seen and I’m so glad I didn’t go with VCT because reclaimed barn wood is durable and I don’t care if they get scratched or dirty.  The worse the floor gets, the better it looks.  I know it’s way different than every other trailer out there and really, isn’t that the point?


And the floor was almost FREE!


Tuesday, October 2, 2012

Thank you, Grandma!

So, to review, I got a “free” trailer from my boyfriend.  I’ve spent money on new walls and sealed seams, upholstery, and new tire and wheels. 

At this point I’m telling myself…”I really, really, need a budget.”

So I created a spreadsheet with all the various projects and listed approximate amount of money, for each, that would need to be spent.  I also checked online to determine what the trailer’s approximate value would be when I was done.  (there is NOTHING worse than spending oodles of money on a project that ain’t worth nothin’ when you’re done.)

A doable Budget?  Check.


The kitchen drawers, after they were sanded.

Something worth noting, at this point, is that I am NOT made of money.  I work hard to put food on the table for my two kids and struggle from one payday to the next.   (Oh, and I don’t have credit cards.  They’re super evil.) So, how could I justify spending so much on a side project? 

Early in the project my grandmother died and, quite unexpectedly, left me a small bit of money.  What she left me was just enough to pay a few bills, take the kids clothes shopping, and set aside some for trailer completion.  The money, however, didn’t change my overall idea about saving as much money as I could by doing most of the work myself, it just made the project actually doable.  Frankly, if I didn’t have that money, the trailer project would have sat for much longer than the year it took me to get her done.

So, with the big projects behind me
it was time to get started on the actual work of the renovation.

The kitchen, before demolition.

It all started with paint, or more accurately, primer.  I had some left over from another project so I started by sanding every surface inside and then proceeded to prime them all.  Ceiling, walls, cupboard doors, every…flat…surface.  I think it took me a couple of weeks’ worth of free time and over a gallon of primer.  Between coats (there were two coats of primer applied) I sanded.  Yeah.  It was a dusty mess but I knew that if I didn’t prime first the paint would peel, or not stick, or just look nasty against the 1950’s pinkish (painted on) gross mess that was already there. 

Sand.  Prime. Sand. Prime. Sand.

Now....it's ready for paint. 


First coat of primer, in the dining area.

At this point everyone thought I was nuts and they almost convinced me too.  It was ugly inside and out.  Windows, a door, and walls with primer.  The rest of the parts and pieces sat, scattered, all over my house and garage.

This was gonna’ take some time, tenacity, creativity (there’s that word again) and patience…lots and lots of patience.


Saturday, September 29, 2012

Place Your Hand Over Heart

I love Craig, and his little list.  I think that the internet is amazing and in 2008 I used it so much I wrote, and published, a 400 page book about my dating “adventures” on craigslist.  When I’m bored I peruse the FREE ads.  I’ve purchased two cars, sold a camper and a truck, found a rental, sold various items and purchased more household goods than I can account for.  So…it’s only natural that throughout my trailer project I turn to my old friend, Craig, for both goods and services.

The upholstery on the old dining benches had to go.  They were torn, punctured, stained, stinky, and…well…almost 50 years old.  The only good thing about them is that they were built well and had never been inhabited by mice.  (mouse urine is very icky!)


So I set out to find an independent (read: cheap but good) person who would recover them and also use my foam pads to build a split mattress for the back.  I got 3 bids.  I know the drill.  Ask for 3 people to bid on the project, then negotiate with the guy (or gal!) you like most.  

The bids ranged from $1500 - $500.  In this case, I couldn’t bring myself to talk down the lowest bidder and I really liked the guy.  He was local, prompt, professional, nice and enthusiastic about working on my project.  (Bonus points for being enthusiastic about tearing off 50 year old upholstery and having to deal with a semi-over-controlling Type A personality like myself!)

I delivered the benches and foam pads (left over from a previous project) to him on a Saturday with my truck and told him to call me when he was done.  It helps when you’re asking for bids to let the contractor know that he or she will have as much time as they need to get your project done.  If you’re truly not in a hurry, let them take all the time they need.

There’s an old saying in contracting:
You can have something fast, cheap, or good. 
Pick Two.

Design wise, I toyed with the idea of polka dots, pink lace, 50’s diner, rock and roll, and rustic cabin themes.  But none of them really struck me.  And, there were so many trailers that were “cute” and “girly” and that’s just not me. 

So until the point when I met with the upholsterer, I couldn’t decide on a color scheme.  So when we met I picked out two colors that would be reasonably priced (he had some left over from a prior project) and readily available.  I also wanted to go with a somewhat neutral back round colors so the appliances and accessories would stand out more.  I chose off-white and deep red.  I then immediately went to the paint store with my fabric swatches and had them custom color sample paint to match.    Ta Da!!

When perusing Pinterest.com (the world’s greatest online resource for all things pictorial) for trailer ideas I put “red and white” into the search field and up popped the most amazing Sherwin Williams color scheme that then became the overall plan:  Vintage Americana. 


Picture this…
dark blue accents…deep red accent walls…
off white ceiling...light purple/blue side walls…
stars and stripes…mason jars…rod iron…
antique baskets…reclaimed barn wood floors.
Can you see it?

“Oh, say can you see…by the dawn’s early light…what so proudly we hailed….at the twilight’s last gleaming”

Yeah.  Corny.  I know.  That’s how I roll.

Thursday, September 27, 2012

Dry Rot and Demolition

Although I had already invested almost $1000, I didn’t want to get much further into the renovation without addressing the dry rot.  Now, before you shake your head in disbelief, let me assure you that the far cry majority of all 50 year old travel trailers have dry rot to some degree.  (How much dry rot they have depends on how long they sat outside, with or without a tarp.)  Since I was still “addressing structural issues” I went on the hunt for someone that could do what I didn’t have the tools for: replace the rotted rear corner panels.

First, a comment about tools:  Throughout this project I have been challenged by many issues.  Since I lack a well-stocked garage full of hand and power tools (and a man to move in and bring his) finding a tool to do the job at hand was a challenge.  In a nutshell, since I wasn’t planning on making a major investment in “good” tools that I would use over and over, I found both new and used tools in three places that worked just fine: 1) craigslist 2) Harbor Freight 3) neighbors and friends. 

More about tools later…

Not having the tool to do the job is one thing.  Not having the tool, or the expertise, or the dry space…prompted the need for an “outside contractor”. 

Hidden Dry Rot

I found Roger on…you guessed it…craigslist.  But before I dropped her off at his house, however, I actually got 3 bids for the same repair.  I wasn’t looking for the cheapest guy in town; I was looking for a reasonable bid from a guy I liked. (And hoped I could trust) 

Wait.
I’m starting to sound sexist but really, I couldn’t find a chick to do the job!

The bids ranged from $5000 to $1000.  (I can only assume the guy who bid $5000 really didn’t want to fix my trailer so, if he was going to, he wanted to make it WELL worth his time.)  Roger originally bid $1500 but I talked him into doing it for $1200 and his bid also included the removal and resealing of both top seams from front to back.

Peeling bck the aluminum

Two weeks later she was returned to me with a new back panel and new sealant around all of the outside windows and seams.  (And he fixed a dime-sized hole in the roof / ceiling that had been concealed by a pile of leaves, still stuck there.)

Wow!  A new rear window panel.
Intact undercarriage / frame.  Check.
New brake light wiring.  Check.
New tires and wheels and bearings.  Check.
New rear panels and wall seams.  Check.

Ta Da!  A new rear side panel.

Let the demolition begin!

I’d already taken out 3 bags of garbage, carpet, insulation, more carpet, rotten wood, curtains, shelves, spider webs, and more…moldy…stinky…gross…green…carpet squares. 

The full demolition would, however, also involve taking out the cabinet doors (4 hinged, 4 sliders) drawers (2) the icebox, countertop, stove, range hood, sink, faucets (2), upholstered seats, table, light fixtures (3) and…I forget the entire list but suffice it to say that 3 months later I was amazed that I was STILL taking things OUT of the trailer and had not yet begun to put things back in.

A peek inside before demolition.

I would like to note here that during the entire project the inside of my actual house looked like a trailer blew up in it.  I had parts lying everywhere for months!  I tried to keep, and reuse, as much as I could but bought new stuff as needed. Also, the time spent on my trailer was NOT being spent cleaning my house.  My 17 year old daughter even commented on the fact that she pretty much assumed I forgot how to do laundry.  (Out of necessity, she was doing it by that point, and that was her way of making me feel guilty…NOT!!)

Did I mention that I’m a single working mom with two teenagers?

 
After demolition was mostly done, it was time to move on to painting (after priming of course) and upholstery.

The fun stuff!?


Tuesday, September 25, 2012

Wiring & “The Strategy”: Restoration or Renovation?

After getting new wheels and tires, Mark graciously agreed to tow the trailer back to his house and store her there till I could get her home.  But there was still one more thing that we needed to get done before I could tow the trailer to Oregon.  My next task was to get new low voltage wiring so the brake lights and turn signals would work. 

Trailer wiring is a somewhat specialized skill (and one that requires not only know-how, but insane amounts of patience) so I did what any penny pinching project coordinator would do…I found someone on craigslist to do it for me.  For $100 (and $37 worth of wiring supplies from Shucks Auto Supply) all the lights, and blinkers, were repaired and now worked perfectly.

Wiring.  Check.

After four hours of scrubbing, and the new tires and wheels were installed.

I’ve towed a lot of vehicles in my lifetime so the idea of towing a little 13 foot trailer from Washington was not a big deal.  Not a little deal, since towing anything is a bit nerve wracking, but with some time and a slow go I was sure it would be just fine.  Mark, after having deduced how cheaply/poorly the trailer was constructed to begin with, was not so sure.  His approach to towing the trailer to Oregon involved two vehicles, one towing and one behind to monitor the trailer’s road worthiness while in route. 

The whole conversation about the original trailer’s construction and its towability (not a word, by the way) led to a more in depth discussion about the overall strategy: renovation vs. restoration.

Mark felt pretty strongly that the trailer needed to be torn down to the frame and rebuilt from scratch.  (And to his credit there was quite a bit of dry rotted wood that needed to be replaced anyways) 

The wood was so rotten the aluminum was showing through!


While his approach sounded ideal I didn’t have the money, time, space, expertise, or inclination to invest that much into this particular project.  Also, his list of “to dos” is already a mile long so any help I would need from him would be on an “as available” basis. 

Restoration would require a LOT of help…renovation, not as much.

If you’ve ever done a house remodel, you understand the difficulties that can come along with making key decisions on a project.  Upgraded plumbing fixtures or just good enough?  ½” carpet pad or ¾”?  French doors or solid wood?  White paint or off white? Deck or patio?  Restoring or renovating a trailer, vintage or not, is very similar.  You have all the attributes of a house (plumbing, flooring, paint, electrical, upholstery, cabinets, appliances, etc..) but on a smaller scale.

It was after a few more discussions on the subject, that it was finally decided:  the trailer project was mine, to do with as I wanted.  The caveat, of course, would be that I would have to do it all with my money, my time, my space, and my creative efforts.  (Emphasis on creative efforts)  

Daunting?
A bit.
But doable….

Here she is, chained to a tree so she won't get stolen.

The logistics of getting two cars to and from Oregon on a non-rainy weekend in the winter, proved to be the challenge that eventually prompted Mark to buy a trip permit, and tow the trailer to Oregon for me.  (Yet another reason why I love him so…..)

He was finally rid of her.  (And she didn’t fall apart on the freeway, in route.) 

Now the hard work begins…


Friday, September 21, 2012

And Then There Was Three

This past week my boyfriend and I celebrated our three year anniversary.  While it may seem odd to include the details of my personal relationship in a very public blog, Mark is very much a part of the trailer story, and my life, so I cannot resist but share a bit about him, and us, and her….

In 1967, Mark’s parents bought a trailer. 


She was only 4 years old but a bit worn from her no-doubt harrowing journeys between the states of Arizona, Alaska, Washington, and everywhere in between.  (The road through Canada to Alaska, at that time, was not paved) Mark was very young then and therefore cannot recall the details about why his parents never used the trailer.  But they never did so there it sat, for 44 years, under a tarp, on the corner of land at his parent’s house. 

After Mark’s parents passed on he inherited the house, and the trailer, and the chore of maintaining the property.  One day late last summer I was helping him with chores around the place and asked “What are you going to do with that trailer?” 

He sarcastically replied, “You want it?”

“Sure!”

“No, seriously, you DON’T want it!” was his best retort.

He had already tried to give it to a friend but she wanted him to fix it up so it would at least roll down the road. Since he wasn’t THAT vested in getting rid of it, the “deal” fell through.  He even talked to a salvage guy about taking it away but the guy told him he would have to pay $300 for them to do him the favor of “disposing of it”.  No go.  By this time, in Mark’s eyes, the trailer was completely worthless. (Later we found out a couple of guys tried to steal it, just a few days earlier that same week, but a curious neighbor asked them about their intentions, they got nervous, and fled.)

See?!  Now you know why I say “fate” led me to her!

I live in Oregon. Mark’s house is 150+ miles north of me so getting her “home” to Oregon would not be easy.  My first task was finding out if her frame was intact and then, if so, getting new tires and wheels and bearings.

~Insert Les Schwab Tire Commercial Here~


I called Les Schwab, from Oregon, asking about their mobile tire service.  The location I called was only a couple of blocks from where the trailer sat.  I had asked them how much they would charge to go over and take a look at her.  They said they wouldn’t charge me anything for a diagnosis.

They drove over, inflated her tires, towed her back to the shop, took off her old wheels and tires, inspected the frame, and called me with the prognosis: the frame was still intact, quite sturdy actually, and the owner of the shop was a vintage trailer enthusiast.  (He used a forklift to put the trailer inside the shop each night so it wouldn’t get stolen while it was there awaiting service.  His technicians thought he was nuts.)

Seven hundred dollars later I had new wheels and tires, packed bearings, and a welded-on tongue bracket for the new spare. 
She was rolling, but she wouldn’t yet leave Washington for several more months…

Tuesday, September 18, 2012

For as long as I can remember...

...I've seen things for how they could be, instead of how they are. 

This particular attribute has NOT served me well when it comes to romantic relationships and perhaps is the very reason why I’ve always been romantically challenged. This trait, however, has served me quite well when it comes to projects, and often leaves others to ask “How did she do that?” 

As a teenager I would ride my bike past a small abandoned farmhouse not far from where I grew up.  I would daydream about living there, and working on it to restore it to it’s former glory.  The “No Trespassing” signs did nothing to deter me from exploring behind the rusted hinges and broken windows of a once thriving household.  Of course, I had no idea how much time, money, or expertise it would actually take to restore that little broken down house because that was many years before I ever painted a wall or learned the difference between a jigsaw and a miter saw.   It didn’t matter though, I was enthralled. 

I guess you could say that the “fixer upper” in me is embedded deep in my soul.

If you’ve known me for more than 5 minutes you know I’m always working on something.  (Sometimes…many “somethings”.)  I think I’m addicted to the “before” and “after” pictures of renovation projects so it only makes sense that one would find it’s way into my life.  The story itself will unfold in this blog but suffice it to say that my trailer project has proven itself to be a perfect way to combine my love of renovation and travel.

Before I embarked on my vintage trailer journey I didn’t even know that vintage trailer renovation was a growing trend supported by an aging population eager to explore on a budget.  I didn’t realize that there are an increasing number of people who passionately live with a “less is more” perspective and actually prefer tiny houses to big mansions.  Gone is the ideal of saving, or borrowing, to buy a $50,000 recreational vehicle with all the bells and whistles.  The new, poorer, middle class that has been created by a recessed economy is making due with less.  But, it seems, they’re not giving up on their dreams completely.  They’re just changing them, scaling them back.

Let me restate: 
I’m not giving up on my dreams of travel completely.
I’m just changing them, scaling them back.

The best part of these trends is that they seems to imply that the materialistic world I grew up in is, perhaps, shifting to support a more easily realized set of ideals.  The best part of my dream of travel is that now (with the addition of my renovated trailer) it requires only...a sense of adventure, a little bit of gas money, and some time off from work.

Given this new set of circumstances, Dr. Seuss’ words seem quite fitting, don’t you think?

"You have brains in your head.
You have feet in your shoes.
You can steer yourself any direction you choose.
You're on your own.
And you know what you know.
And YOU are the one who'll DECIDE WHERE TO GO...”